A nice library to process HTTP requests in Python. Make code shorter. that’s what Python expects.
Read about it :
Click

A nice library to process HTTP requests in Python. Make code shorter. that’s what Python expects.
Read about it :
Click
This post will be mostly code. Please use proper indenting cuz Python otherwise will make your life hell. If you’re using Sublime go to, set Convert Indentation to tabs.
Gist : I have used the collections.defaultdict dict DT for implementing a dict of sets.
Vertices have been stored as adjacency list kind of elements as a dictionary. The code is raw and may have errors ( though no compilation error as of the post’s writing). Please comment for additional details. This is purely for testing purposes.
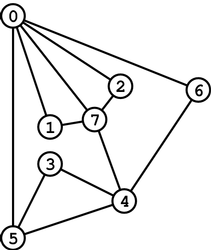 A Graph.
from collections import defaultdict
#The Graph will be a dictionary of sets
class Graph():
def __init__(self, connections, directed = False):
self.graph = defaultdict(set)
self.directed = directed
self.add_connections (connections)
def add_connections(self, connections):
for node1,node2 in connections:
self.add_connection(node1,node2)
def add_connection(self, node1, node2):
self.graph[node1].add(node2)
if not self.directed:
self.graph[node2].add(node1)
def remove(self, node):
#removes all references to the node
#Use iteritems for dict items like k,v in dictname.iteritems():
for n,cons in self.graph.iteritems():
try:
#Removing from a set involves setname.remove(element)
cons.remove(node)
except KeyError:
pass
try:
#Removing from a dictionary involves rem dict_element_name
del self.graph[node]
except KeyError:
pass
def isconnected(self, node1, node2):
if node1 in self.graph[node2] or node2 in self.graph[node1]:
return True
return False
def dfs(self,start):
#If start node does not exist, return None (search is futile)
if start not in self.graph:
return None
#Start with an empty set
visited = set()
#To return unse ( which is not a set
unset = []
#Initially fill stack with start vertex
stack = [start]
#While stack is not empty keep repeating this algorithms
while stack:
#Take the first element of stack (pop means last inserted , aggressive)
vertex = stack.pop()
#If vertex has not been visited yet, add it to visited and look for all the element in graph[vertex]
if vertex not in visited:
visited.update(vertex)
unset.append(vertex)
stack.extend(self.graph[vertex] - visited)
return unset
def bfs(self, start):
if start not in self.graph:
return None
visited = set()
queue = [start]
unset = []
while queue:
vertex = queue.pop(0)
if vertex not in visited:
visited.update(vertex)
unset.append(vertex)
queue.extend(self.graph[vertex] - visited)
return unset
#Should work but not tested
def findpath(self,v1, v2):
m = bfs(v1)
if v2 in m:
return m[:m.index(v2)+1]
return None
So, I hope you managed to setup the django project and could visit the welcome page after running the server. Now, this tutorial contains the interesting part. Creating an app that works !!!! Interesting ? Yes, certainly, for I will guide you in this tutorials as how to create models, url configurations, map a basic relationship between models, migrate the models to create suitable relations in the DB (SQLLite in your case), write code to query the database and also, run the django shell ( a ridiculously important part of learning django), apart from the primary task of getting the application run on the default django server.
In some future tutorial I will guide you how to setup django with Apache server and MySQL.

Let’s now create an app within the musicStore project.
Create the app
$python manage.py startapp musicApp
This creates all the necessary files inside the musicStore/musicApp/ directory.
Confirm if the following files were created after this command.
musicStore/musicApp/__init__.py
musicStore/musicApp/apps.py – Configurations for the app for django settings. We won’t usei t in this tutorial, new addition in 1.9
musicStore/musicApp/models.py – Modles are created here
musicStore/musicApp/views.py – Views are created here (Kind of Controller logic analogous to MVC)
musicStore/musicApp/urls.py – URL routing information, maps URLS to Views
musicStore/musicApp/admin.py – Admin settings for the app useful for the admin console
musicStore/musicApp/migrations/ – Contains all the migrations file so that any database change is recorded and could be used, reverted to etc.
musicStore/musicApp/tests.py – File to contains unit tests. Mock-Brraintree would be a good start which I will cover in some future tutorial
“Projects vs. apps
What’s the difference between a project and an app? An app is a Web application that does something – e.g., a Weblog system, a database of public records or a simple poll app. A project is a collection of configuration and apps for a particular website. A project can contain multiple apps. An app can be in multiple projects.”
-From the django website
Model
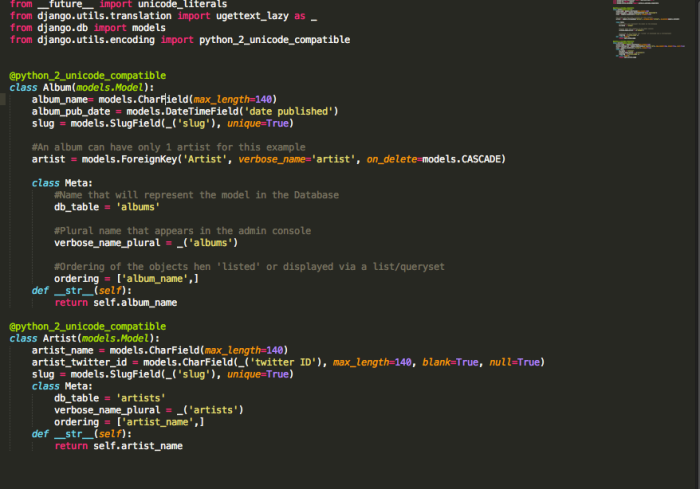
We can see that there are two models, Album and Artist. One Album can have only 1 Artist but 1 Artist can publish multiple Albums. This relationship is defined by the Foreign Key field in Album, album_artist and hence, every Artist object will have an album_set object containing the list of Albums that it may have, and this is a django property.
You will also observe a Meta inner class in the model. this is used to define important metadata pertaining to the model, like ordering of model objects if displayed in a list somewhere, name it will be known as in the DB, name it will be known as in the admin console etc and many more. Full documentation is available in : https://docs.djangoproject.com/en/1.9/intro/tutorial02/
Migrations

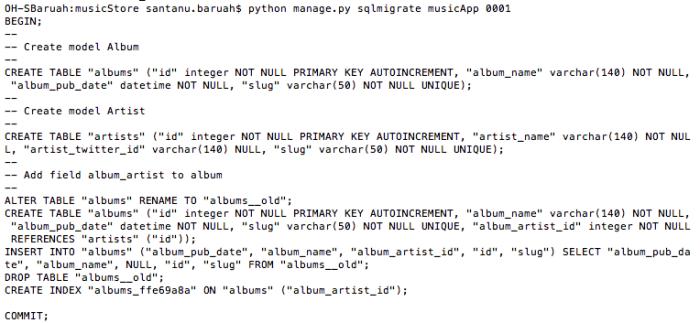
$python manage.py makemigrations
It tells Django that some changes to our models have been made, and are to be stored as a migration in the musicapp/migrations/ directory.
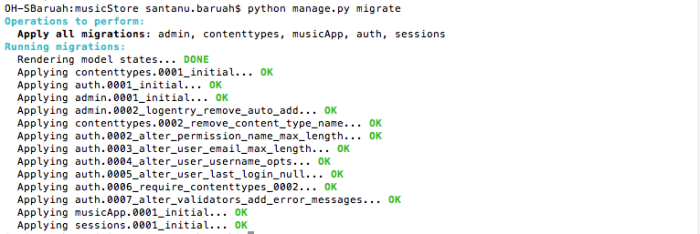
At this point, we can either directly migrate to apply those changes from the migration file or we can check the actual set of SQL commands that are going to be executed by django. The former is done by the migrate command while the latter can be performed by the sqlmigrate <migration_id> command.
In short, makemigrations forms a migration file but doesn’t apply any changes yet. migrate actually applies the changes recorded in the migration file.
__str__ method of models
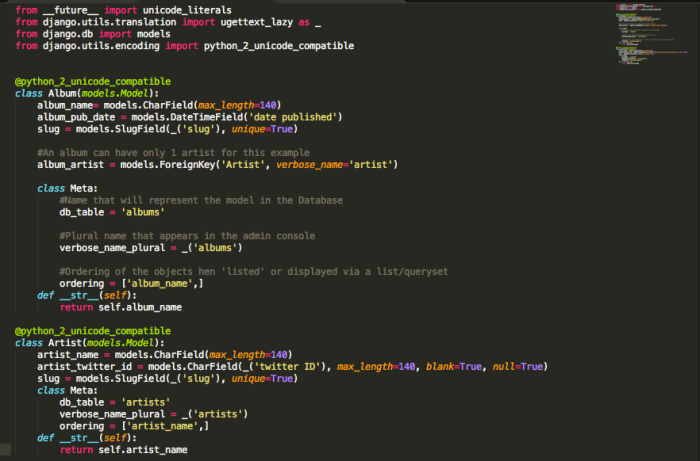
Now, we add the __str__ method in the models because it provides us the string representation of an object whenever queried. You’ll understand the importance once you start using the shell or the admin console, apart from others which utilise it.
Using the django shell
$cd ~/Desktop/musicStore/
$python manage.py shell
>>>from musicApp.models import Artist
>>>Artist.objects.all()
[]
>>>from musicApp.models import Album
>>>Album.objects.all()
[]
First of all, congrats on getting access to the django shell. Here you can do a lot of things, including querying the django database and everything python. it is useful for small fixtures like checking if some value is being returned the way it is supposed to be, before applying changes in the UI etc. You will learn a lot more about it in the tutorial and coming posts.
Adding models objects – Continue the terminal from the previous section
>>> artist1 = Artist(artist_name = “The Chainsmokers”, artist_twitter_id = “TheChainsmokers”, slug = “thechainsmokers”)
>>> artist2 = Artist(artist_name = “Imagine Dragons”, artist_twitter_id = “ImagineDragons”, slug = “imgd”)
Add Artists
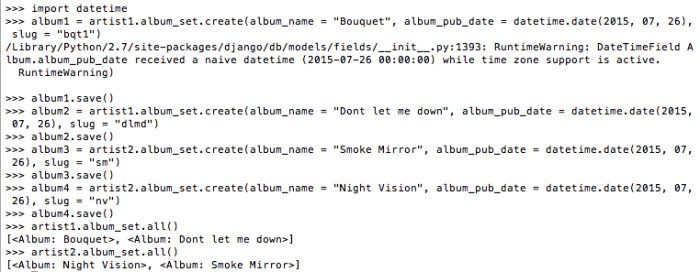
Note : As you can see, we are adding stuff via the django shell but evenetually, there will be forms in the web page in the form of django forms or HTML forms which will help you add objects. this addition via shell is for illustrative purposes.
artist1.album_set gives you the albums related to the artist1 and so on. This means, if A has a Foreign Key B, any instance of B, say b, can query all the related instances of A as b.a_set.all() and so on.
To be continued….

‘M happy to be back to you all.
So, this post will help you setup your first django web app and will also fill in details and notes on how many of its small components work and interact. I have just explained the basic components in my previous post which is the first part without any hint of python-django code. Let me do that this time and get you acclimatized to the things that may go wrong often as well, apart from the things that will go right! This part 2 tutorial will comprise a few defined set of steps.
Before we begin I want you to refer this tutorial if you want to know anything about writing your first django app beyond this tutorial please visit : https://docs.djangoproject.com/en/1.9/intro/tutorial01/
Also, I assume that you have python 2.7 installed in your machine as this tutorial will be on django 1.9x and python 2.7. this tutorial should work on both Windows and Unix based systems, including Mac, though the directory structure is assumed to be of Mac. One can use it in Windows by making slight changes to the tutorial’s instructions.
So, let’s begin…
To know how to install pip please refer my tutorial on installing pip. All the commands below are to be executed in the terminal.
Install django
$pip install django
Check if Installation is successful
$python
>>>import django
>>>print django.get_version()This will tell you the version of django that you just installed. If you did not install it properly you will see error messages in executing the first or the second function.
When done, type :>>exit()
or
>>>ctrl + Dto exit from the python prompt
Create your project directory and ‘cd’ to it
$cd ~/Desktop/
$mkdir djangoTutorialStuff
$cd djangoTutorialStuff
Make a django project
$django-admin startproject musicStore
Check if it worked and you may want to check the directory structure too.
$cd musicStore
You’re gonna see two things inside the project. A manage.py file and a musicStore directory. The manage.py is the principle python file governing the whole project. Anything you want to do with the project goes like python manage.py <your_command>.
Confirm if the musicStore directory has the following files :
__init__.py – Tells that this directory is a django directory
settings.py – Contains the overall settings of the whole django project (musicStore)
urls.py – Contains the root url configurations for the musicStore project
wsgi.py – contains theapplicationcallable which the application server uses to communicate with your code
As of now, only the project has been setup without any setting changes.
Next you have to create app(s) of your choices to actually do something of its own. These apps are pluggable django entities that can also be used by other projects like musicStore does. Apps will be created in the next tutorial – Part 3 !
Confirm if project setup works
$cd ~/Desktop/musicStore
$python manage.py runserver
Verify if the following output shows up :
Performing system checks…
System check identified no issues (0 silenced).
You have unapplied migrations; your app may not work properly until they are applied.
Run ‘python manage.py migrate’ to apply them.
February 29, 2016 – 15:48:41
Django version 1.9.1, using settings ‘musicStore.settings’
Starting development server at http://127.0.0.1:8000/
Quit the server with CONTROL-C.
Now visit : http://127.0.0.1:8000/
If django welcome page shows up you’re good to go. If not, please leave a comment.
Hey Friends,
Let me help you with that crazy piece of code that deals with decorators !
So what is it ?
Do you remember the ‘@’ symbol above the function? Why did the programmer even use it ? First is first, what do you even call it ? Annotation? Here you can call it PIE!
In a sentence, a decorator in python is a function that decorates another function! I swear, if it was not important I would not have bothered to write a blog post on it. It IS IMPORTANT when you move to higher order development like using Django, Flask or anything cute.
Basics first :
A function is a first class object in Python. This basically means that you can use it as object variables all over your code like passing it as arguments, assignment etc. If I am not wrong it is the case for JavaScript too. Have you ever used callbacks ? If not you should and then you will know the power of this particular feature.
def myFunc():

print 'Hey, it\'s me myFunc!!'

x = myFunc

x()
Do yo know what it will do? Yes, it will print whatever is inside myFunc for it is the same as myFunc now.
Now, see this piece of code :
def decoratorFunc(someFunc):

def wrapper():

print 'I am before someFunc'

someFunc()

print 'I am after someFunc'

return wrapper
# BREAK
myFunc = decoratorFunc(myFunc)

myFunc()
I am before someFunc
Hey, it’s me myFunc!!
I am after someFunc
So, the middle line has been decorated with a line above and a line below. The two decorating lines come from the decorator function, here which is decoratorFunc.
Observe the last code statements again.
myFunc = decoratorFunc(myFunc)

myFunc()
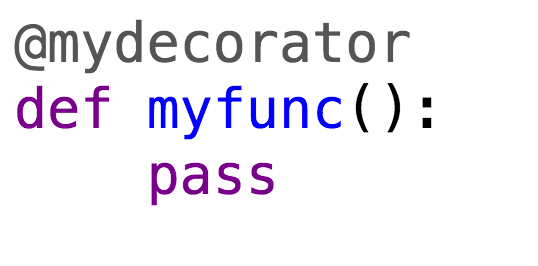
These could be rewritten with some syntactical sugar as :
@decoratorFunc

def myFunc():

print 'Hey, it\'s me myFunc!!'
That’s it !!!
Hehe, and yes, you know a little more now. 🙂
In this article I would like to introduce the usage of Hadoop in your local machine. I will also give a hint about how to use it in a cluster provided you have access to the same in my future post in a similar topic. First, you have to Login to a Unix or Linux machine. If you have one, good and great. Else you can use Amazon’s Linux Server for free if you choose its free tier machine. I will write another tutorial on the usage and access to AWS Linux Server in a future post. The following are the Steps to follow to SETUP your system.

wget http://www.trieuvan.com/apache/hadoop/common/hadoop-2.6.0/hadoop-2.6.0.tar.gzcd ~vi .bashrc
export JAVA_HOME=/usr/lib/jvm/java-1.8.0

export HADOOP_CLASSPATH=$JAVA_HOME/lib/tools.jar

export HADOOP_INSTALL=

export PATH=$PATH:$HADOOP_INSTALL/bin

export HADOOP_USER_NAME= any nameLocal Usage
When you are using Hadoop using something other then Java a good way would be to use the Streaming Mode. It would generally take inputs in the form of standard user input or output which can be provided indirectly. What that exactly means will be explained soon. Just keep in mind that the Hadoop Streaming process uses two distinct programs having your Map and Reduce functions. Unlike mincemeat’s Map function it has actually a dedicated program which performs the Map task. You can check mincemeat’s Map Reduce implementation here. Similarly, it has a dedicated file to perform the Reduce task.
Please note that in real world with multiple machines in clusters to perform your task, you can also use one Map and more than one Reduce implementing files.
So, now you’re ready with your Hadoop. What next? Yup, you gotta write your Map implementer and Reduce implementer as well. In this case we will assume that we need only one Reduce implementer and the problem to solve will be to print the sum of a given set of numbers from a list with every number in a newline and also, print the count of the numbers. Let’s break this solution into easy verbal steps as follows :
While, the former will give you the count of all the numbers, the latter will give you the total of all the values. You can also count all the occurrences of all numbers before making them distinct pairs to print the sum before even counting the number of numbers. This is so simple right? So, let’s get our hands dirty on the code.
Map Program:
Reduce Program:
Programming part is over. What next ? Running the programs!!! How ? Not directly with console input and console output but THROUGH HADOOP. This can be done by writing a small command in bash or writing a Script instead for the same. Let’s see what it is!
hadoop jar $HADOOP_INSTALL/share/hadoop/tools/lib/hadoop-streaming-2.6.0.jar

-input YOUR_INPUT_FILE/DIRECTORY -output YOUR_OUTPUT_DIRECTORY -mapper map.py -reducer reduce.py
– Ctrl+CCopy and paste this in a file with the extension sh and change privileges of the file with the following commands :
touch myFirstHadoopScript.shPaste your code in the file by :
vi myFirstHadoopScript.sh – Ctrl+V :wq Returnchmod 755 myFirstHadoopScript.sh./myFirstHadoopScript.shYour Program should run properly with the output as :
count – your count
sum – your sum
Wow!!!! You are a Hadoop Rookie now 😀
Tips :
To keep testing your program during the development phase you can check for the correctness by
cat YOUR_TEXT_FILE | YOUR MAP PROGRAM | YOUR REDUCE PROGRAMYou ALSO need to keep removing the OUTPUT_DIRECTORY for every execution or you can use a new one instead. Otherwise you will get bad errors!
So, you want to know what is Hadoop and how can Python be used to perform a simple task using Hadoop Streaming?
HADOOP is a software framework that mainly is used to leverage distributed systems in an intelligent manner and also, perform efficiently operations on big datasets without letting the user worry about nodal failures (Failure in one among the ‘n’ machines performing your task). Hadoop has various components :
I will walk you through the Hadoop MapReduce component. For further information on Map Reduce you can either Google. For now I will present to you a brief introduction of it.

What is MapReduce
To know it truly you have to understand your problem first. So, what kind of problems can Map Reduce solve ?
Do you think that these are trivial problems ? Yes, they appear as if they are but what if you have millions of records and time for processing the results is very important for you? Thinking again ? You’ll get your answer.
Not just time but multiple dimensions of a task are there and map reduce if implemented efficiently, can help you overcome the risks associated with processing that much data.
Okay, enough of what and why! Now ask me how !!!

A MapReduce ‘system’ consists of two major kinds of functions, namely the Map Function and the Reduce function (not necessarily with the same names but more often with the pre-decided intentions of acting as the Map and Reduce functions). So, how do we solve the simple problem of counting a million numbers from a list quickly and display their sum ? This is, let me tell you, a very long operation though simple (For a complex program in MapReduce using not Hadoop but mincemeat module please go throughthis.
In this particular example the Map Function(s) will go through the list of numbers and create a list(s) of key-value pairs of the format {m,1} for every number m that occur during the scan. The reduce function takes the list from the Map function(s) and forms a list of key-value pairs as {m,list(1+)}. 1+ means 1 or more occurrences of 1.
The complicated expression above is nothing but just the number m encountered in the scan(s) by the Map Function(s) and the 1’s in the value in the Reduce task appear as many times as the number was encountered in the Map Function(s). So, that basically means {m, number of times m was encountered in the Map Phase}.
The next step is to aggregate the 1’s in the value for every m. This means {m,sum(1s)}. The task is almost done now. All we got to do is just display the number and the corresponding sum of the 1s as the count of the number. But wait, still you don’t understand as why this is a big deal right? Anybody can do this. But hey! The Map Functions aren’t just there to take all your load and process alone all of it. Nope! there are in fact many instances of your Map Function working in parallel in different machines in your cluster (if it exists, else just multithread your program to create multiple instances of Map (but why should you when you have distributed systems). Every Map Function running simultaneously work on different chunks of your big list, hence, sharing the task and reducing processing time. See! What if you have a big cluster and many machines running multiple instances your Map Functions to process your list? It’s simple; your work gets done in no time!!! Similarly, the Reduce functions can also run in multiple machines but generally after sorting ( where your mincemeat or hadoop programs will first sort the say,m‘s and distribute distinct such m‘s to different reduce functions in different machines). So, even aggregation task gets quicker and you are ready with your output to impress your boss!
A brief outline of what happened to the list of numbers is as follows:
Map functions counted every occurrence of every number mMap functions stored every number m in the form {m,1} - as many pairs for any number mReduce functions collected all such {m,1} pairsReduce functions converted all such pairs as {m,sum(1's)} - Only 1 pair for a number mReduce functions finally displayed the pairs or passed it to the main function to display or processIn the part two of the tutorial I will explain how to install Hadoop and do the same program in python using Hadoop Framework.
For a similar program in mincemeat please go through :
import mincemeat
import sys
file = open(sys.argv[1], “r”)
#The data source can be any dictionary-like object
data = list(file)
file.close()
datasource = dict(enumerate(data))
def mapfn(k, v):
import hashlib
total = 0
for num in v.split():
condition = num.isdigit()
if condition:
yield ‘sum’, int(num)
if condition:
yield ‘sumsquares’, int(num)**2
yield ‘count’, 1
def reducefn(k, vs):
result = sum(vs)
return result
s = mincemeat.Server()
s.datasource = datasource
s.mapfn = mapfn
s.reducefn = reducefn
results = s.run_server(password=”changeme”)
sumn = results[“sum”]
sumn2 = results[“sumsquares”]
n = results[“count”]
variance = (n*sumn2 – sumn**2)/float(n**2)
stdev = variance**0.5
print “Count is : %d”%n
print “Sum is : %s” %sumn
print “Stdev : %0.2f”%stdev

While on my way to completion of my program in Information Systems at University of Cincinnati, I stumbled upon this very interesting assignment in my Cloud Computing course offered by the computer science department. It was a simple 4 or less character strings password breaker that attacks a given 32 or less characters’ hex string and provides the strings that are in its VALUE BUCKET. For example we have the sample execution :
Attacking d077f…
{‘found’: [‘cat’, ‘gkf9’]}
In the aforementioned example we are attacking the first 5 characters of a 32 digit hashed hex string where the values collide. That’s another topic of interest that I will discuss later.
The program uses mincemeat.py module from https://github.com/bigsandy/mincemeatpy. This is a Python 2.7.x Map Reduce library that can divide map and reduce tasks to distributed clients to make tasks faster. In my upcoming posts I will write about Map Reduce and Hadoop.
Logic
This can be done in various ways like using pre-built libraries or by some fresh logic like generating first the two character strings and then looping them and appending the same two character strings to them. Once ready, we can choose any series from the list starting with any value from 0 to z ,say , 0000 to 0zzz and consider their last three characters as another addition to our main list. Once done, we can take two character strings and append to the main list and finally, one character strings. This way, we have a total list generating all possibilities of strings form 1 to 4 characters of {0-9 and a-z} in any combination.
In the original list ‘bigdata’ we find the length of the list as len(bigdata) and find all its factors. Once found, we can think of the possible number of clients that will execute the map functions and divide the list accordingly in a dictionary of lists , say, {[‘0’, ‘list-chunk1’],[‘1′,’list-chunk2’]…} and build a datasource dictionary using this to be sent to the servers.
Since the map function and reduce function cannot use global variables from the parent program we have to pass the input hashed hex string in the datasource itself by a simple technique of sending a dictionary within a dictionary. So, instead of {[‘0’, ‘list-chunk1’],[‘1′,’list-chunk2’]…} the datasource looks like {[‘0’, {‘d077f’,’list-chunk1′}],[‘1’,{‘do77f’,’list-chunk2′]}…} etc where every key value pair is being sent to a separate map function or a different client. This can be unwrapped in the map function to obtain the hashed hex string ‘d077f’ and the list that has to be hashed string wise to check if its first five characters match ‘d077f’ (example).
If a match occurs, send the hashed query string ‘d077f’ (example) and the values that hash to it to reduce function.
If map sends a match, capture the results and aggregate all such results into a single list. Example, {‘d077f’, [‘cat’,’wtf’]} send it to the parent program.
Once the parent function receives data from the reduce function the data can be displayed.
Program :
import hashlib
import string
import itertools
import sys
import mincemeat

inputx = sys.argv[1]
deadlist=[]
deadlist1=[]
deadlist2=[] #Final List
deadlist1string = []
deadlist2string = []
print "Attacking %s..."%sys.argv[1]
m = range(0,10)
for num in m:
	deadlist1string.append(str(num))
for char in list(string.lowercase):
	deadlist1string.append(char)
for char in deadlist1string:
	for inchar in deadlist1string:
		#First two chars
		deadlist1.append(char)
		deadlist1.append(inchar)
		deadlist.append(''.join(deadlist1))
		deadlist1=[]

#second two chars
for stringx in deadlist:
	deadlist2string.append(stringx)
	for stringx2 in deadlist:
		deadlist2.append(stringx+stringx2)

length3char = len(deadlist2)/(36)
listFor3Digits = deadlist2[:length3char]

#print listFor3Digits
for stringx in listFor3Digits:
	singlestring = stringx
	deadlist2.append(''.join(list(singlestring)[-3:]))
deadlist2+=deadlist2string+deadlist1string

'''listx = []
haha = len(deadlist2)
for i in xrange(1,haha+1):
	if (haha%i == 0):
		listx.append(i)'''

bigdata = []
#print deadlist2[::5188]
for i in xrange(0,333):
		loldict = {}
		loldict[inputx] = deadlist2[(5188*i):(5188*(i+1))]
		bigdata.append(loldict)
		loldict = {}

datasource = dict(enumerate(bigdata))#333*5188 - 333 key value pairs where values are lists
#chunkData = list(itertools.islice(datasource.items(), 1,2))


def mapfn(k, v):
	for key in v.keys():
		for w in v[key]:
			if hashlib.md5(w).hexdigest()[:len(key)] == key:
				yield hashlib.md5(w).hexdigest()[:len(key)], w

def reducefn(k, vs):
	result = vs
	return result

s = mincemeat.Server()
s.datasource = datasource
s.mapfn = mapfn
s.reducefn = reducefn

results = s.run_server(password="changeme")
for mm in results:
	found = {}
	found["found"] = results[sys.argv[1]]
	print found
	found = {}
