If your model has a date_created or modified etc. kind of object(s) probably you will face a datetime object mismatch issue while asserting equality of your dictionary object with the rendered response dictionary. So, I have created a small function which will help you resolve it.
DATETIMEHELPER = lambda x : str(x.isoformat().split('.')[0])+'Z'
Now, you can call your data object as :
data = {...,"date_created":DATETIMEHELPER(self.model_name.date_created),...}

response.render()

self.AssertEqual(json.dumps(response.content), data)
This post will be mostly code. Please use proper indenting cuz Python otherwise will make your life hell. If you’re using Sublime go to, set Convert Indentation to tabs.
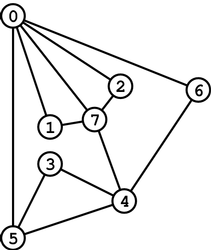
Gist : I have used the collections.defaultdict dict DT for implementing a dict of sets.
Vertices have been stored as adjacency list kind of elements as a dictionary. The code is raw and may have errors ( though no compilation error as of the post’s writing). Please comment for additional details. This is purely for testing purposes.
A Graph.
from collections import defaultdict
#The Graph will be a dictionary of sets
class Graph():
def add_connections(self, connections):
for node1,node2 in connections:
self.add_connection(node1,node2)
def add_connection(self, node1, node2):
self.graph[node1].add(node2)
if not self.directed:
self.graph[node2].add(node1)
def remove(self, node):
#removes all references to the node
#Use iteritems for dict items like k,v in dictname.iteritems():
for n,cons in self.graph.iteritems():
try:
#Removing from a set involves setname.remove(element)
cons.remove(node)
except KeyError:
pass
try:
#Removing from a dictionary involves rem dict_element_name
del self.graph[node]
except KeyError:
pass
def isconnected(self, node1, node2):
if node1 in self.graph[node2] or node2 in self.graph[node1]:
return True
return False
def dfs(self,start):
#If start node does not exist, return None (search is futile)
if start not in self.graph:
return None
#Start with an empty set
visited = set()
#To return unse ( which is not a set
unset = []
#Initially fill stack with start vertex
stack = [start]
#While stack is not empty keep repeating this algorithms
while stack:
#Take the first element of stack (pop means last inserted , aggressive)
vertex = stack.pop()
#If vertex has not been visited yet, add it to visited and look for all the element in graph[vertex]
if vertex not in visited:
visited.update(vertex)
unset.append(vertex)
stack.extend(self.graph[vertex] - visited)
return unset
def bfs(self, start):
if start not in self.graph:
return None
visited = set()
queue = [start]
unset = []
while queue:
vertex = queue.pop(0)
if vertex not in visited:
visited.update(vertex)
unset.append(vertex)
queue.extend(self.graph[vertex] - visited)
return unset
#Should work but not tested
def findpath(self,v1, v2):
m = bfs(v1)
if v2 in m:
return m[:m.index(v2)+1]
return None
So, I hope you managed to setup the django project and could visit the welcome page after running the server. Now, this tutorial contains the interesting part. Creating an app that works !!!! Interesting ? Yes, certainly, for I will guide you in this tutorials as how to create models, url configurations, map a basic relationship between models, migrate the models to create suitable relations in the DB (SQLLite in your case), write code to query the database and also, run the django shell ( a ridiculously important part of learning django), apart from the primary task of getting the application run on the default django server.
In some future tutorial I will guide you how to setup django with Apache server and MySQL.
Let’s now create an app within the musicStore project.
Create the app
$python manage.py startapp musicApp
This creates all the necessary files inside the musicStore/musicApp/ directory.
Confirm if the following files were created after this command.
musicStore/musicApp/__init__.py musicStore/musicApp/apps.py – Configurations for the app for django settings. We won’t usei t in this tutorial, new addition in 1.9 musicStore/musicApp/models.py – Modles are created here musicStore/musicApp/views.py – Views are created here (Kind of Controller logic analogous to MVC) musicStore/musicApp/urls.py – URL routing information, maps URLS to Views musicStore/musicApp/admin.py – Admin settings for the app useful for the admin console musicStore/musicApp/migrations/ – Contains all the migrations file so that any database change is recorded and could be used, reverted to etc. musicStore/musicApp/tests.py – File to contains unit tests. Mock-Brraintree would be a good start which I will cover in some future tutorial
“Projects vs. apps
What’s the difference between a project and an app? An app is a Web application that does something – e.g., a Weblog system, a database of public records or a simple poll app. A project is a collection of configuration and apps for a particular website. A project can contain multiple apps. An app can be in multiple projects.”
-From the django website
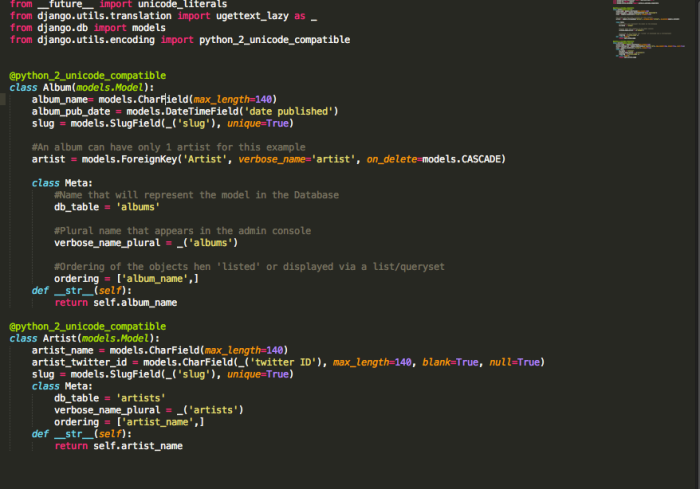
Model
We can see that there are two models, Album and Artist. One Album can have only 1 Artist but 1 Artist can publish multiple Albums. This relationship is defined by the Foreign Key field in Album, album_artist and hence, every Artist object will have an album_set object containing the list of Albums that it may have, and this is a django property.
You will also observe a Meta inner class in the model. this is used to define important metadata pertaining to the model, like ordering of model objects if displayed in a list somewhere, name it will be known as in the DB, name it will be known as in the admin console etc and many more. Full documentation is available in : https://docs.djangoproject.com/en/1.9/intro/tutorial02/
Migrations
makemigrations command
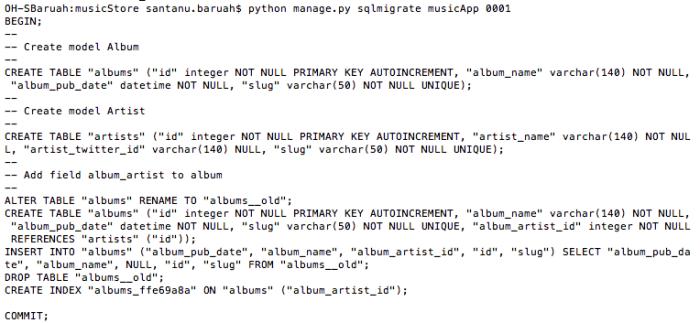
sqlmigrate <migration_id> command
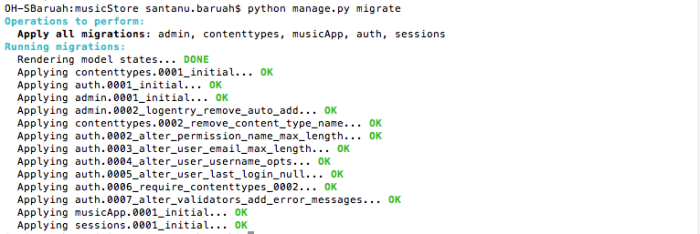
migrate command
$python manage.py makemigrations
It tells Django that some changes to our models have been made, and are to be stored as a migration in the musicapp/migrations/ directory.
At this point, we can either directly migrate to apply those changes from the migration file or we can check the actual set of SQL commands that are going to be executed by django. The former is done by the migrate command while the latter can be performed by the sqlmigrate <migration_id> command.
In short, makemigrations forms a migration file but doesn’t apply any changes yet. migrate actually applies the changes recorded in the migration file.
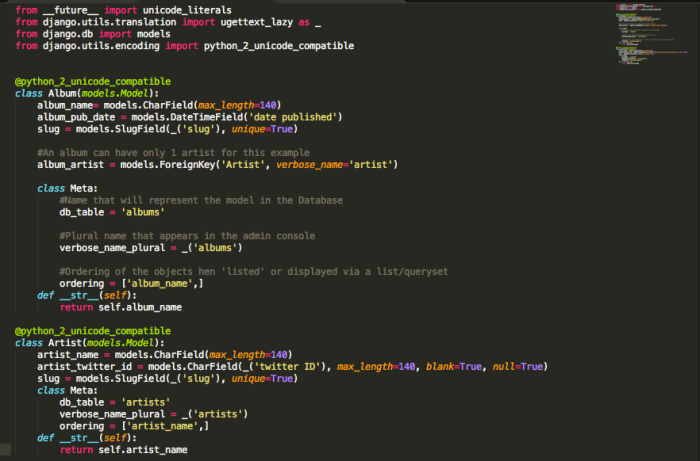
__str__ method of models
Now, we add the __str__ method in the models because it provides us the string representation of an object whenever queried. You’ll understand the importance once you start using the shell or the admin console, apart from others which utilise it.
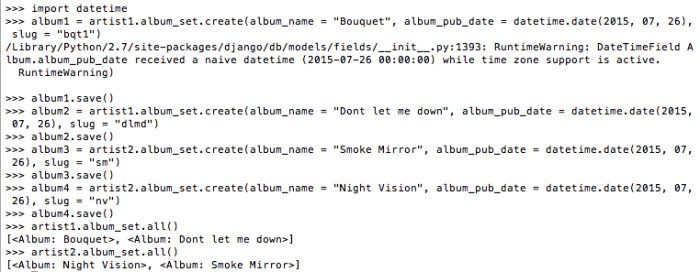
Using the django shell
$cd ~/Desktop/musicStore/ $python manage.py shell >>>from musicApp.models import Artist
>>>Artist.objects.all() []
>>>from musicApp.models import Album
>>>Album.objects.all() []
First of all, congrats on getting access to the django shell. Here you can do a lot of things, including querying the django database and everything python. it is useful for small fixtures like checking if some value is being returned the way it is supposed to be, before applying changes in the UI etc. You will learn a lot more about it in the tutorial and coming posts.
Adding models objects – Continue the terminal from the previous section
Note : As you can see, we are adding stuff via the django shell but evenetually, there will be forms in the web page in the form of django forms or HTML forms which will help you add objects. this addition via shell is for illustrative purposes.
artist1.album_set gives you the albums related to the artist1 and so on. This means, if A has a Foreign Key B, any instance of B, say b, can query all the related instances of A as b.a_set.all() and so on.
To be continued….
Next tutorial will be on using URLS and Views to query these model objects.
So, this post will help you setup your first django web app and will also fill in details and notes on how many of its small components work and interact. I have just explained the basic components in my previous post which is the first part without any hint of python-django code. Let me do that this time and get you acclimatized to the things that may go wrong often as well, apart from the things that will go right! This part 2 tutorial will comprise a few defined set of steps.
Before we begin I want you to refer this tutorial if you want to know anything about writing your first django app beyond this tutorial please visit : https://docs.djangoproject.com/en/1.9/intro/tutorial01/ Also, I assume that you have python 2.7 installed in your machine as this tutorial will be on django 1.9x and python 2.7. this tutorial should work on both Windows and Unix based systems, including Mac, though the directory structure is assumed to be of Mac. One can use it in Windows by making slight changes to the tutorial’s instructions.
So, let’s begin…
To know how to install pip please refer my tutorial on installing pip. All the commands below are to be executed in the terminal.
This will tell you the version of django that you just installed. If you did not install it properly you will see error messages in executing the first or the second function.
When done, type :
Check if it worked and you may want to check the directory structure too. $cd musicStore
You’re gonna see two things inside the project. A manage.py file and a musicStore directory. The manage.py is the principle python file governing the whole project. Anything you want to do with the project goes like python manage.py <your_command>.
Confirm if the musicStore directory has the following files :
__init__.py – Tells that this directory is a django directory settings.py – Contains the overall settings of the whole django project (musicStore) urls.py – Contains the root url configurations for the musicStore project wsgi.py – contains the application callable which the application server uses to communicate with your code
As of now, only the project has been setup without any setting changes.
Next you have to create app(s) of your choices to actually do something of its own. These apps are pluggable django entities that can also be used by other projects like musicStore does. Apps will be created in the next tutorial – Part 3 !
Performing system checks… System check identified no issues (0 silenced). You have unapplied migrations; your app may not work properly until they are applied. Run ‘python manage.py migrate’ to apply them. February 29, 2016 – 15:48:41 Django version 1.9.1, using settings ‘musicStore.settings’ Starting development server at http://127.0.0.1:8000/ Quit the server with CONTROL-C.
So, what is Django? It is a very popular web framework based on Python. I love it because it is fast and because it is Python. I like it because it is simple, easy to learn and has all the things necessary to build a web application with a full fledged 3 tier architecture ready. Its ORM or object relational mapping system is world class and so is its template system. As of today, the latest version of Django is 1.9.2.
The intention of this tutorial is to help you understand its components and help you build a basic Django website with a database and views, available to serve pages using is temporary server(Apache etc. are USEFUL in production). Django is huge and so is its documentation. So, I won’t delve beyond the point where you can tell the differences between a view, template, model and static pages in this PART 1. Oh wait! I forgot to inform you that this tutorial on Django is divided into multiple Parts and I will keep posting them one by one based on my time as I sometimes really get busy with my work. But you see, I love writing my blog posts and hence, I WILL find out some time to help my readers create awesome web apps!!!!
Before I proceed, I would like to inspire my readers by letting them know who are the players using Django today :
Instagram
Pinterest
Mozilla
The Washington Post
Bitbucket
Speir.tv
More…
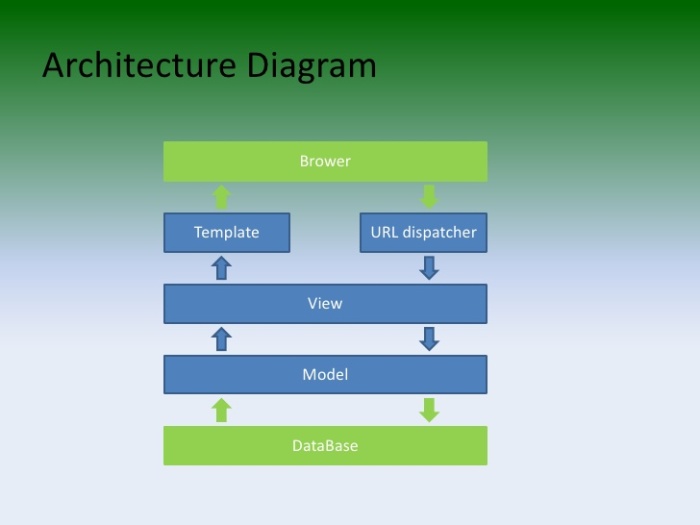
BASIC COMPONENTS of a DJANGO APP
A Django app consists mainly of the following components :
Models
Views
Templates
URL Dispatcher
Database
Let me introduce every component briefly:
MODEL
It is the Model equivalent from the MVC Framework. For example, if your web application is about an online Music Portal having details of artists and their albums, there could be two probable models, namely, Artist and Album. Each model will have its own attributes. For example, Artist will have artist_id, name, age, twitter_id etc. as its attributes whereas Album will have album_id, name, date_of_release and artist_id as its attributes where artist_id would be a foreign key corresponding to the artist to whom the album is attributed to. It is simple stuff for you if you have prior object oriented programming experience. There’s a lot more about models which will be properly explained in a future tutorial, probably with a running example.
As a side note, as soon as you create a model a database entry corresponding to the model DOES NOT get created. But, once you ‘migrate’ the changes, the Database is updated with the new model data. This and a lot more will be explained later.
VIEW
The funny part is that this is NOT actually the equivalent of the View in the MVC architecture but more like the Controller equivalent of the MVC architecture. Confused? Don’t be. It is simple. Just get used to the idea of the View in Django being the main logic controlling component that handles the requests based on certain URL patterns and generates output accordingly. In a very simple tone, every view responds to a certain request by presenting a template in some form or the other. When I say a template…..
TEMPLATE
…it basically means the front end component in Django. It is filled or not filled with ‘context’ data that is , when sent, sent from the view that led the application to the template. Generally, html files but sometimes could be anything else, like JSON, XML etc. Content type and other response variables are sent from the view.
In layman terms :
Request_URL leads to View A
View A processes Context_Data + Template
Template presented with Context_Data
DATABASE
The actual database that generally the user or developer need not see. But can be easily seen. PostgreSQL, SQLite, MySQL…could be anything.
URL DISPATCHER
A file, urls.py contains all the URL mappings as what URL pattern leads to what view.
IMPORTANT METADATA
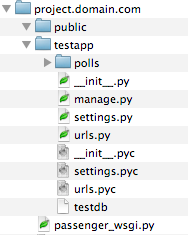
It is very important to note that a Django Project may contain 1 or more Django apps where each app comprises the aforementioned components. Now, I would like to explain briefly the directory structure of a Django project.
Here, project.domain.com is our Django project which has a testapp app inside corresponding to the parent project. As you can see,testapp has a file called settings.py which has all the settings for the entire project and there is ONLY 1 settings.py. The public directory is for publicly accessible, mostly static, files.
Note : Every directory in an app needs to have a file __init__.py to tell Django that it is a django directory.
Let me help you with that crazy piece of code that deals with decorators !
So what is it ?
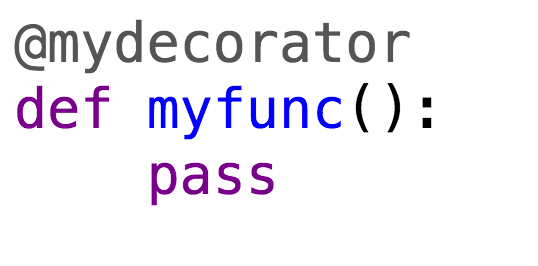
Do you remember the ‘@’ symbol above the function? Why did the programmer even use it ? First is first, what do you even call it ? Annotation? Here you can call it PIE!
In a sentence, a decorator in python is a function that decorates another function! I swear, if it was not important I would not have bothered to write a blog post on it. It IS IMPORTANT when you move to higher order development like using Django, Flask or anything cute.
Basics first :
A function is a first class object in Python. This basically means that you can use it as object variables all over your code like passing it as arguments, assignment etc. If I am not wrong it is the case for JavaScript too. Have you ever used callbacks ? If not you should and then you will know the power of this particular feature.
def myFunc():

print 'Hey, it\'s me myFunc!!'

x = myFunc

x()
Do yo know what it will do? Yes, it will print whatever is inside myFunc for it is the same as myFunc now.
Now, see this piece of code : def decoratorFunc(someFunc):
def wrapper():
print 'I am before someFunc'
someFunc()
print 'I am after someFunc'
return wrapper
# BREAK myFunc = decoratorFunc(myFunc)
myFunc()
I am before someFunc
Hey, it’s me myFunc!!
I am after someFunc
So, the middle line has been decorated with a line above and a line below. The two decorating lines come from the decorator function, here which is decoratorFunc.
Observe the last code statements again.
myFunc = decoratorFunc(myFunc)

myFunc()
These could be rewritten with some syntactical sugar as : @decoratorFunc
def myFunc():
print 'Hey, it\'s me myFunc!!'
In this article I would like to introduce the usage of Hadoop in your local machine. I will also give a hint about how to use it in a cluster provided you have access to the same in my future post in a similar topic. First, you have to Login to a Unix or Linux machine. If you have one, good and great. Else you can use Amazon’s Linux Server for free if you choose its free tier machine. I will write another tutorial on the usage and access to AWS Linux Server in a future post. The following are the Steps to follow to SETUP your system.
Install Java Developer Kit latest Suite – Java 8 by first downloading the tar file
tar zxvf jdk-8.xx-linux-x64.tar.gz or YOUR Tar File
Paste the following to the .bashrc file
export JAVA_HOME=/usr/lib/jvm/java-1.8.0

export HADOOP_CLASSPATH=$JAVA_HOME/lib/tools.jar

export HADOOP_INSTALL=

export PATH=$PATH:$HADOOP_INSTALL/bin

export HADOOP_USER_NAME= any name
Go to any terminal window and type hadoop
If you’re not getting any error you are good wit the installation!!! Congrats!
Local Usage
When you are using Hadoop using something other then Java a good way would be to use the StreamingMode. It would generally take inputs in the form of standard user input or output which can be provided indirectly. What that exactly means will be explained soon. Just keep in mind that the HadoopStreaming process uses two distinct programs having your Map and Reduce functions. Unlike mincemeat’s Map function it has actually a dedicated program which performs the Map task. You can check mincemeat’s Map Reduce implementation here. Similarly, it has a dedicated file to perform the Reduce task.
Please note that in real world with multiple machines in clusters to perform your task, you can also use one Map and more than one Reduce implementing files.
So, now you’re ready with your Hadoop. What next? Yup, you gotta write your Map implementer and Reduce implementer as well. In this case we will assume that we need only one Reduce implementer and the problem to solve will be to print the sum of a given set of numbers from a list with every number in a newline and also, print the count of the numbers. Let’s break this solution into easy verbal steps as follows :
Write a Map function(program) that will print “1 <number>” for every number that it encounters in every line and not just distinct numbers but all occurrences.
Write a Reduce function(program) that will read every line of output from the Map function’s(program’s) in the form “Key Value” where Key will be 1 and the Value will be the number.
The Reduce function(program), as the next step, will aggregate all the unique Values and add up their count of 1s which are their Keys.
Once the Keys are counted for every distinct Value all you need to do is display the SUM of the Keys and the SUM of the (Values*Keys).
While, the former will give you the count of all the numbers, the latter will give you the total of all the values. You can also count all the occurrences of all numbers before making them distinct pairs to print the sum before even counting the number of numbers. This is so simple right? So, let’s get our hands dirty on the code.
Map Program:
#!/usr/bin/env python
importsys
importmath
dp={}
listNums=list(sys.stdin)
fornumberinlistNums:
print“1\t%s“%(number.strip())
Reduce Program:
#!/usr/bin/env python
importsys
count=0
sumNum=0
fornumberinsys.stdin:
(key,val)=number.strip().split(‘\t‘,1)
if(int(key)==1):
count+=int(key)
sumNum+=int(val)
print“count\t\t\t%s\nsum\t\t\t%s“%(count,sumNum)
Programming part is over. What next ? Running the programs!!! How ? Not directly with console input and console output but THROUGH HADOOP. This can be done by writing a small command in bash or writing a Script instead for the same. Let’s see what it is!

 A Graph.


 Let me introduce every component briefly: